Category: Street Photography Techniques

Learn about various Street Photography Techniques here with us, at www.street-photography.net

  • 5 Steps to Become a Better Street Photographer

    5 Steps to Become a Better Street Photographer

    In 2018, I began photographing in the New York City subway on my commutes to distract my mind from the difficulties I was going through at the time, not knowing this would lead my photography in a new direction, towards becoming a street photographer.

    Several years later, I’m now working on my third street photography project, have gallery representation, a solo exhibition, experience as a photojournalist for the New York Post, and have led countless workshops. Through this ongoing journey, I’ve learned a vast amount through trial and error. I’d like to share five tips that have significantly improved my street photography.

    1. Use a Prime Lens

    The versatility of a zoom lens is without a doubt the ideal lens for landscape, sport, event, and wedding photographers. For street photographers, prime lenses are ideal and let’s discuss why.

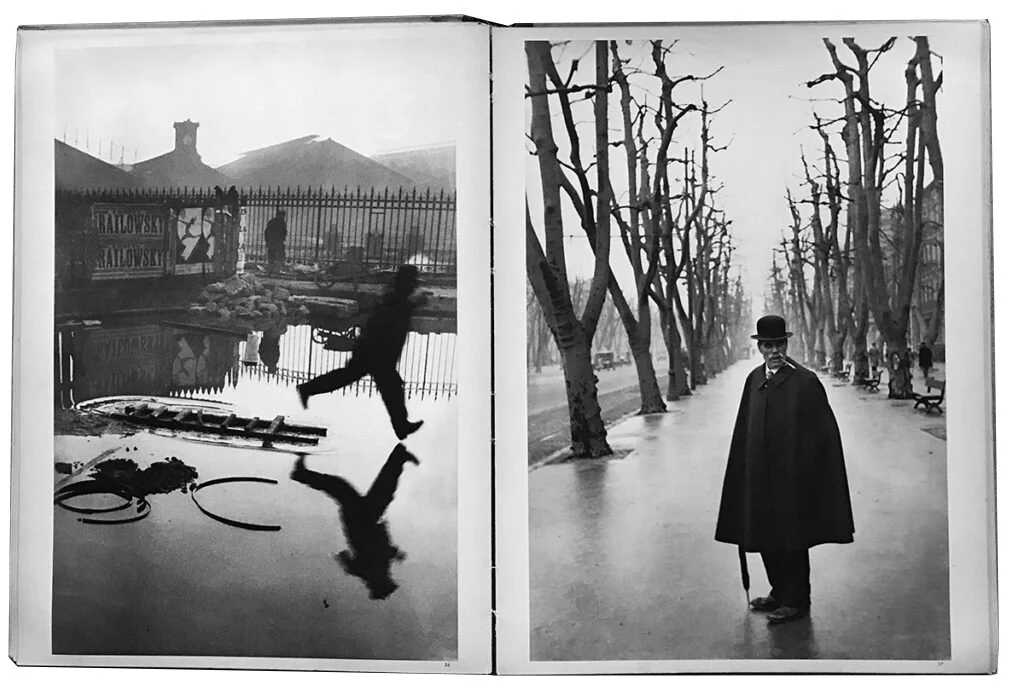
    Using a prime lens will improve your composition, by training your eye to see the world through that specific millimeter you chose. Over time you will become faster at composing and seeing photos on the street. To capture what Henri Cartier- Bresson called “The decisive moment”,  everything must align in a fraction of a second, focus, exposure, and composition. With a zoom lens, you will waste precious time figuring out the right focal length. With a prime, you instinctively know where to stand and how your composition will look in that chosen focal length. 

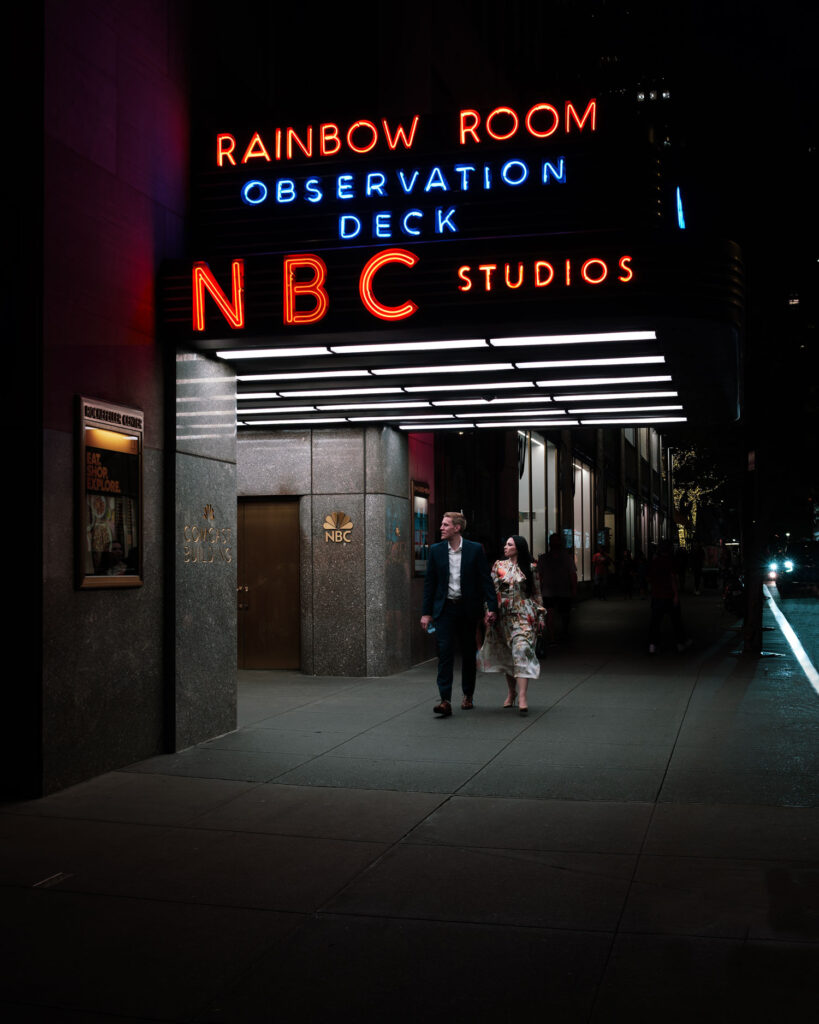
    Prime lenses also offer faster apertures, allowing you to shoot in low-light situations such as night time street photography. The difference between a lens that has a starting aperture of f/4 vs f/1.2 is massive in terms of light-gathering abilities, opening up an entirely new world of possibilities.

    The three primes I recommend for street photography are the 50mm, 35mm, and 28mm. Let’s break down those choices so you can pick the right prime lens for you.

    50mm

    Pros

    The 50mm, also known as the nifty-fifty for its affordability as an entry level prime. The major camera manufacturers all offer a sub $300 option, making it a great way to get into primes. The 50mm is compact, light weight, and offers a closer to the eye’s field of view. It’s great for portraitures. and gives you some distance from your subject as you build confidence in getting closer to your subjects. 

    Cons

    For street photography, the 50mm can feel constrained. You also have a higher chance of missing focus when shooting quickly. After many years of using the 50mm, I found the field of view limiting, it doesn’t isolate and pop subjects like an 85mm for portraits, nor does it provide the contextual storytelling afforded by a 35mm or wider lens.

    35mm 

    Pros

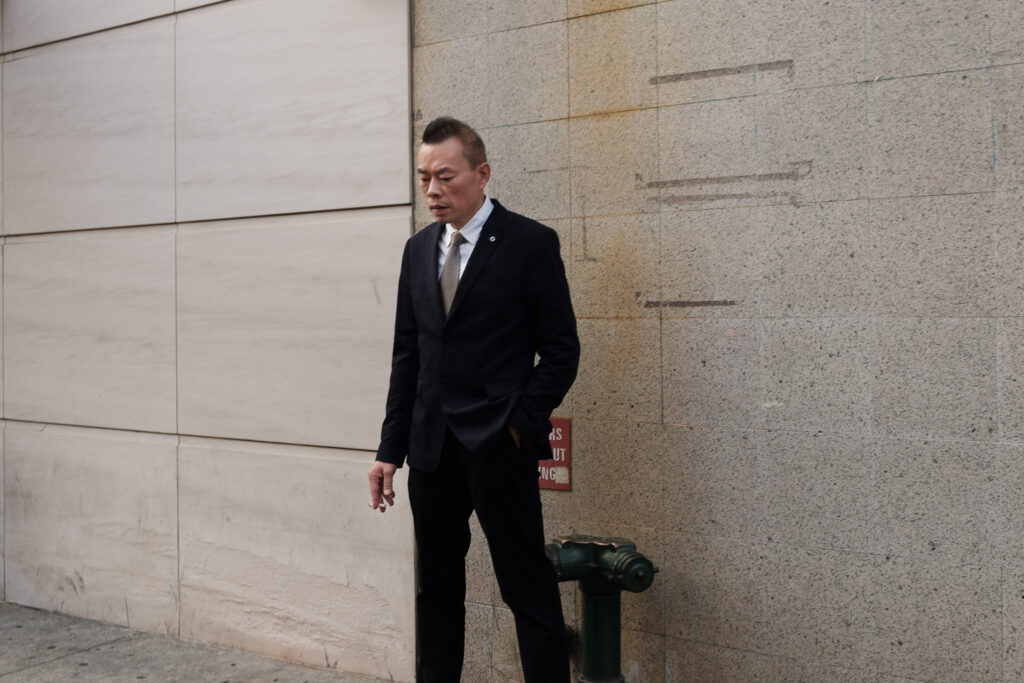
    The 35mm is the most versatile prime lens with a large field of view that we see naturally without distortion. This lens is my personal favorite for street, documentary, travel, and environmental portrait photography. The 35mm is great to capture subjects in contexts which allows you to tell a stronger story more easily.

    Cons

    35mm at first feels familiar, but there is a learning curve.. You’ll need to learn how to dance with this lens, how close you can get to the subject before distorting the subject. If you are coming from a 50mm you will need to be more aware of the edges of your frame when composing. 

    28mm

    Pros

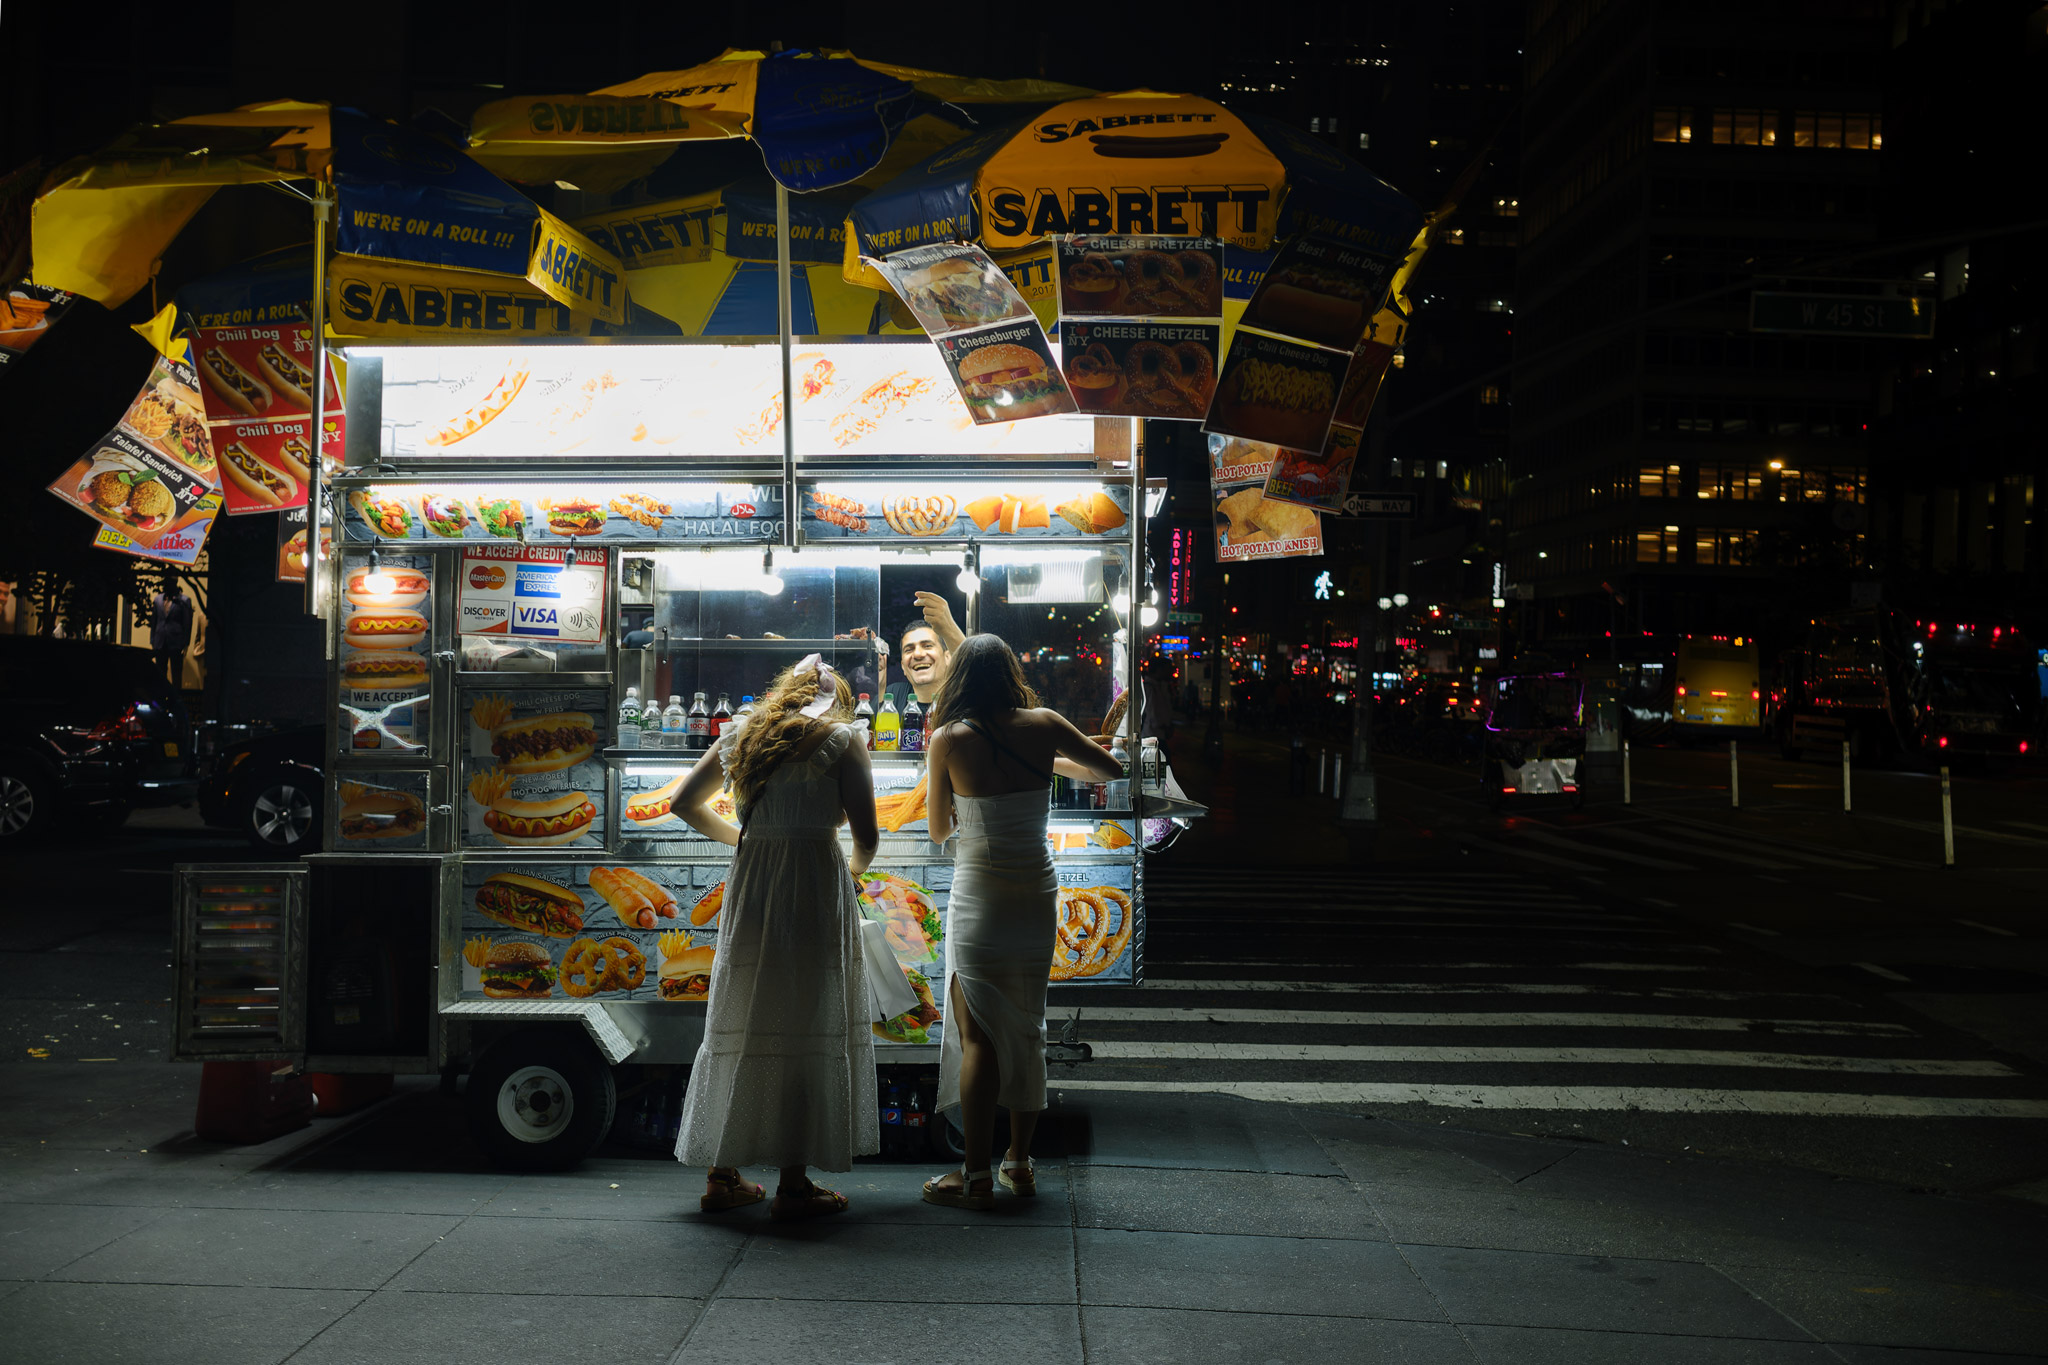
    The 28mm, a wide angle lens allows you to capture an entire scene with a deep depth of field allowing for layered storytelling. With both foreground and background in focus and with its wider angle, this lens is ideal for shooting from the hip. You can capture truly dynamic compositions that neither the 50mm nor the 35mm can achieve. If you thought the depth of field was better with 35mm then 28mm is even easier to render the entire scene in front of your lens in sharp focus enabling even easier zone focusing. You can also get more subject separation between various elements within the frame.

    Cons

    You will need to get very close to your subject to fill the frame. Wide angle distortion can be a distraction from the story you’re trying to tell your viewers. Composing clean/minimalist street photos will be difficult with such a large field of view and everything being in focus. 

    2. Photograph More

    Think of photography as a language, the more that you use the language the more fluent you will become. Get in the habit of bringing your camera with you every time you step out the door. Have it on you, not in your bag. As soon as you are outside, take an exposure reading and set your setting so when you see something you want to photograph your exposure is already set. When you notice the light change, adjust your exposure accordingly for the next moment.

    The more you use your camera it will start to become second nature to you. Over time you will become faster at taking photos allowing you to focus on your surroundings, subjects, and compositions.

    3. Slow Down

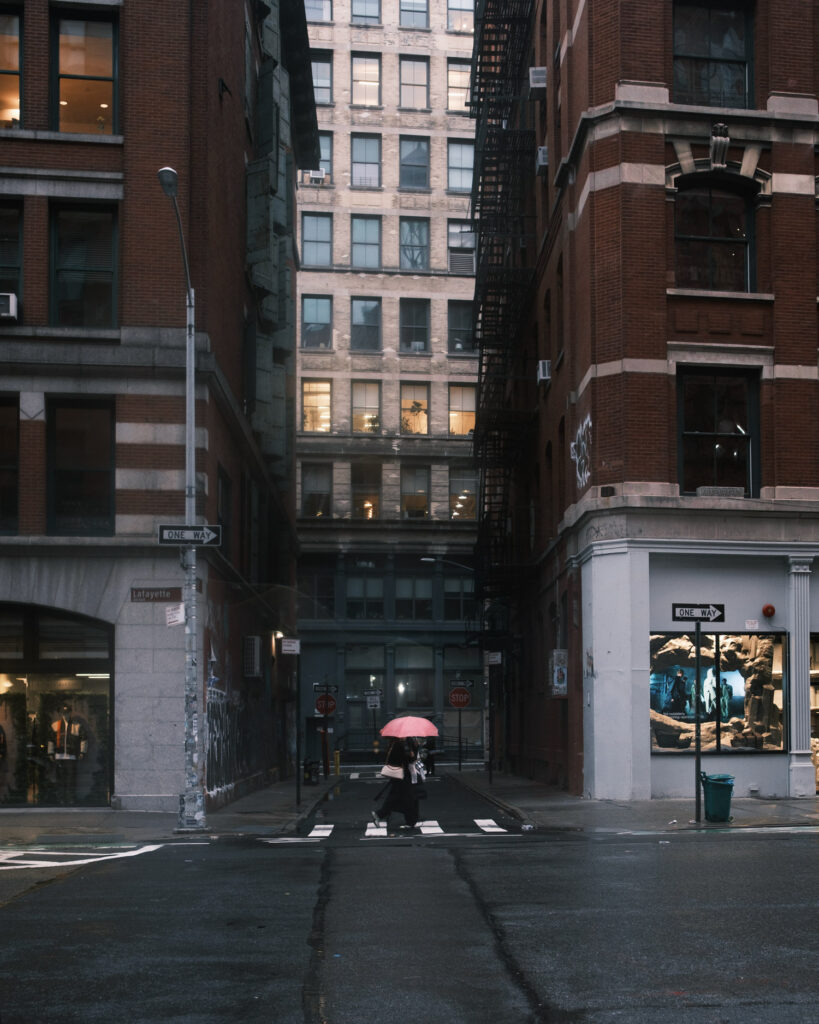
    To quote Ferris Bueller: “Life moves pretty fast. If you don’t stop and look around once in a while, you could miss it.”  Slowing down and looking around will reveal more opportunities to capture. In street photography, the action unfolds not in front of you but to the left and right of you, in doorways, windows, side streets, and street corners. 

    Meandering through the streets will bring a kind of meditative state. A state where you are not thinking about bills, work, relationships, or other life issues, but focused on the moment and the light and how to frame it. By being relaxed and enjoying the moment will bring lucidity to your photography. 

    4. Immerse Yourself in the Area

    When you take a photo in an area that interests you, don’t move on immediately, explore that area thoroughly. Cross the street and look back from where you took the photo; if it’s an intersection, visit all four corners. If there’s a café or bar nearby, go in, sit by the window or outside, observe how the light changes, and talk to the people who live there. The more you understand the area you’re photographing, the more insight you gain into capturing images that tell a deeper story.

    5. Find Common Threads in Your Street Photos 

    As photographers, we are creatures of habit. Subconsciously, we gravitate to specific things, quiet threads that weave our work together. The more time you spend on the streets, the more these patterns begin to emerge themselves.

    After a few months and a hundred images, you’ll notice ten of them feature street performers from different corners of the city or you keep finding yourself pulled toward the color blue from neon signs, painted doors, clothing, reflections. These recurring elements aren’t accidents; they’re signals of your emerging visual voice.

    By recognizing these threads, you can lean into them. Let them guide you. Use them as parameters for your next outing, seek more of what resonates with you, or push yourself to explore that theme from new angles.

    This process of discovery is how your visual voice begins to take shape, and how your work evolves into stories only you can explore and tell.

  • Street Photography at Night: First-Time Guide to New York City

    Street Photography at Night: First-Time Guide to New York City

    It’s your first night in New York City with your camera in hand and you’re ready to hit the streets, but where should you go? You’re in luck, because this guide highlights several spots where you can capture a ton of images. Most first-time visitors to NYC stay at hotels in and around Times Square. If that’s you, all you’ll need are comfortable shoes and an extra camera battery.

    As a New Yorker and you will hear this from other New Yorkers, we avoid Times Square like the plague. It’s worth walking through once in your life to check it off the bucket list, but that’s about it. Times Square is overcrowded, overly commercialized, and a tourist trap, not exactly the best place if you want to capture the true feel of NYC.

    Where Should You Go?

    East of Times Square, however, is a treasure trove of iconic historic buildings, towering office towers, local businesses, and beautiful quiet neighborhoods. Start by walking east down 42nd Street toward Grand Central Terminal.

    Grand Central Terminal

    Grand Central Terminal, which opened in 1913, has remained a majestic architectural landmark of NYC. Its illuminated exterior holds its own among the surrounding skyscrapers, and its magnificent, cavernous interior practically begs to be photographed.

    Tudor Bridge

    42nd Street from the Tudor Bridge. Photo by David Castillo

    A 12-minute walk further east along 42nd Street will bring you to the Tudor Bridge, located in the historic Tudor City district. The bridge offers a fantastic view of the entire length of 42nd Street.

    Midtown East

    Midtown East, Manhattan, NY. Photo by David Castillo

    From Tudor City, head north on either 2nd or 3rd Avenue. These well-lit streets are lively in the evening and offer plenty of opportunities for street photography. At 50th Street, turn west toward 6th Avenue.

    Rockefeller Center

    NBC Studios. Photo by David Castillo

    Your walk will lead you to Rockefeller Center, an Art Deco masterpiece spanning 22 acres between 48th and 51st Streets. This complex is home to Radio City Music Hall, NBC Studios, and the observation deck at Top of the Rock. From here, you’ll be just a short walk back to your hotel.

  • How to practice street photography without leaving your neighbourhood.

    How to practice street photography without leaving your neighbourhood.

    Why do we all think we need to visit the city centres to practice street photography?

    Street photography can be practiced anywhere. It is not the preserve of big city locations. It does not need to be do int eh centre of cities, it can be make anywhere. Great street photographers know that they need to be bale to photograph the places they have access to. Those places happen to be in your neighbourhood. 

    Henry Wessel

    Henry Wessel, who photographed in San Fransisco area for over 30 years. Working mostly in Black and White he would take his camera out whenever he had a errand to run. His idea is that a good photograph can happen anywhere. Taking that idea why not photograph the area that you live in. Your own neighbourhood while it might not be what you see in others photographs it is what you have access to and for a photographer access is everything.

    To improve you need to be able to practice your eye and return repeatedly to the same spot till you get the image that was in your sides yes when you first made the image. And like all good artists photographers need to be able to practice so why not photograph your own location.

    Henry Wessel interview on KQED where he talks about his process. 

    Henry mostly used a film Leica with a 28mm lens and Kodak Tri-X for his work.  

    Saul Leiter

    Saul Leiter is another example of a photographer who made street images in his neighbourhood. He is now considered a early pioneer of colour street photography. You can see Saul Leiter’s work at his website here https://www.saulleiterfoundation.org/

    The movie, In No Great Hurry: 13 Lessons in Life with Saul Leiter. Is a good exploration of Leiter’s approach to making images in his Neighbourhood, Okay, he did live in New York City, for most of his life and spent most of it photographing the area around his home. So in a way he had an home town advantage. That is what you get when you photograph your neighbourhood.

    Bill Owens

    There are photographers who have photographed Suburbia like Bill Owens made while working as a photojournalist for a local newspaper. 

    Bill Owens published a book called Suburbia back in 1972 , it was reprinted and expanded on in 1999 , Which has been quite influential.

    Bill Owens Suburbia

    Amazon UK link

    Amazon USA link

    What will you do?

    We all know what our neighbourhood looks like, as that is where we live. We however we often forget that someone else does not know what it looks like and how life is lived in your area as they live elsewhere. What for you is everyday, to someone else is exotic. So why not photograph, what you know, as you can always go back and rephotograph it, working often will let you eventually make image that show how you see things in your area. This is a great way to become a much better street photographer. 

    Street Photography without leaving your neighbourhood 

    So you want to practice street photography, then get up go for a walk, take your camera. Make sure the battery is charged and the memory card is in the camera before you head out.

    Then you need to notice things. Notice the quality of the light, check out what time of day it is, for the light you just noticed. Is the light quality what you like, could it be better, would a different time of day, give the light a different direction or angle. Would an overcast day allow you to see into the shadows, or would a bright sunny day create deep shadows. These things are all learning steps in training your visual perception and being in your neighbourhood.

    You can go back and see the same scene often. Notice how it changes, in different lighting conditions and times of the day. This is a great first step and a huge as I like to call it, the hometown advantage, that you have when you are photographing your own neighbourhood. 

    A thought process on finding time to make street photographs.

    I will use myself as an example. I live in London, near Ilford the place where the Ilford Photo company, had their headquarter until as recently as 1996. Maybe, I should take the bus for 10 minutes and go and photograph this area. If I had more time I would, ‘no stop’ that is a negative thing to say, if I had more time. As we can always find time can’t we? I could, I suppose, just take a different route home. Whenever, I am out and about, I could take a little longer to get home, so I can walk around the streets of Ilford, for 20/30 minutes at a time. This would give me to time to explore my neighbourhood.

    If I was to do it often, it would add up to a significant about of time, this would let me get images. Looking for ways to find time in our busy lives, is what we all need to do, especially if we are looking to make enough time to get projects off the ground. Finding a way to incorporate the photography process, into our daily lives is a good step to making street photography images. It helps us to document the lives of those around us and to show what life is like at this moment in time where we live. 

    How can you carve out time in your daily routine to make a project on your neighbourhood? We would love to see your suggestions in the comments below.

  • How to reduce Street Photography anxiety

    How to reduce Street Photography anxiety

    Recently, I found a video by Faizal Westcott and a blog post on the subject of street photography anxiety. As I thought he did a really good video and post on this topic so I wanted to share it here with you.

    The blog post is here:

    OVERCOME STREET PHOTOGRAPHY ANXIETY

    and his first video on this subject is here:

    Overcoming anxiety is hard.

    Anything worth doing can be hard. Street photography is not an easy genre of photography. It takes time to get comfortable being out side on the streets raising ones camera to make an image.

    Something that I remember Martin Parr once saying to a question about him making images in public places. When questioned about did you take my photo. His response to this is no, I made my photo. You might just happen to be in it but it is my photo. I know this can come across as arrogant. However, I also see the point of his comment. As he is a photographer with a distinctive style and he is most definitely making his image. Yet this is something we often do not consider. We are all making our own images.

    CCTV exists just about everywhere in the UK, we have what I am told is the highest concentration of CCTV cameras in the world and yet no one ever seems to worry about them. Whereas street photographers get concerned about what other think of them making images. This is okay as we should consider others when making images. I also think we have an obligation to future selves and the people who come after us to make images of life as it is being lived in public places as these become the historical record of the time that we live in. This for me is the biggest motivator for making street photography images and where social documentary photography joins street photography in defining our times.

    The legendary Robert Frank in action.

    I love this trick. Robert Frank is one of our Hero’s of Street Photography. Here he is doing the classic trick of looking like he does not know what he is doing with his ungainly camera. Sometimes the old tricks work best for getting the images that you want to make.

    Wear your camera, it helps.

    One thing I do to make it easier to get images, is I wear my camera across my body, so it is easy to just use it. I also find that if I walk along a street, taking lots of photos, people tend to leave me alone. As I am not just focusing on them, if I do happen to point my camera at them, while making many images.

    You have only yourself, holding you back from making images, so go out and get working with your camera. You will never know what you come back with, until you do.

    Let us know in the comments below what trick and techniques you use to overcome your fear, hesitancy, discomfort when making images.

  • How to become a better photographer through patience.

    How to become a better photographer through patience.

    Patience is a quintessential part of becoming a better photographer, no matter the genre—be it landscape, street, or portrait photography. Slowing down, whether at a location or when engaging with a subject, will significantly elevate your ability to create more meaningful and compelling images.

    Begin by visually approaching the background before the foreground. When choosing a background, ask yourself:

    • Does it distract from or compete with the subject?
    • Do the colors, textures, and lighting enhance or complement the overall image?
    • Does the background provide balance, depth, or separation from the subject?
    • Is there visual space for the subject to move through?
    • Most importantly, does it support the story you’re trying to tell?
    I fell in love with the background, but it took 25 visits over two years to capture the right foreground.

    Once you’ve found a background that resonates with your vision, let patience guide your process. Explore different camera angles. Spend time observing the environment—what unfolds in that space. Revisit the spot at different times of the day and seasons of the year seeing how the light changes will offer new visual possibilities.

    Take time composing your frame. Discover how even subtle shifts—an inch to the right, a step forward, a lower angle—can completely transform your composition. Always scan the edges and corners of your frame for distractions that could pull attention away from your subject. With time, your eye and mind will naturally begin to compose more intuitively and efficiently.

    Photography is a lifelong creative journey. Be patient with yourself. Learning new gear, exploring how different lenses shape your perspective, and recognizing how your life experiences influence your photography and storytelling—all of it takes time.

    To see more of David Castillo’s work, check out his website here.

  • 8 Street Photography Tips: How to Blend into the Background

    8 Street Photography Tips: How to Blend into the Background

    By David Castillo.

    The genre of Street photography is undefinable, yet you know it when you see it. At its essence, it is photography in its purest form, with no defining rules or set criteria. This freedom to create has broad appeal, which is what drew me in.

    Several years ago, I started photographing in the subways and streets of New York City as a mental health project for myself. In this article, I will share my street images and street photography tips I have learned along the way.

    Wear comfortable shoes

    I walk on average between 12,000 and 24,000 steps when I am out photographing in the streets of NYC. That is about 6 to 12 miles (10 to 20 kilometres) so the importance of wearing the right shoes cannot be overstated. Proper footwear helps you focus on your surroundings and your photography, allowing you to capture spontaneous moments without being distracted by discomfort.

    Blend in

    Avoid bright-coloured clothing and shirts with large logos. Muted and dark colours draw less attention to you and your camera. People are less likely to notice a black camera on a black shirt or jacket. This subtle approach allows you to blend into the background allowing you to capture candid moments. 

    Travel light

    It is tempting to bring multiple cameras and several lenses to cover everything, but a heavy backpack will slow you down and limit your time capturing images. Ideally, carry one camera body and one lens. Bigger is not always better; a large telephoto zoom on a DSLR is like telling everyone on the street, ‘Hey, look at me! My money is in my back right pocket, and you can have it.’

    If you are using a DSLR no worries, lower its profile by removing accessories like a battery grip or cage. Opt for a shorter zoom lens such as 18-55mm or 24-70mm, or a prime lens like 28mm, 35mm, 50mm, or 85mm.

    In my own street photography, I prefer using a 35mm on a small mirrorless rangefinder-style camera. This allows me to get close to my subjects without distracting them. Here are some great street photography cameras to consider:

    • Fujifilm X-Pro series
    • Fujifilm X-E series 
    • Fujifilm X100 series 
    • Ricoh GR series 
    • Leica Q series
    • Leica M series
    • Lecia D-Lux series 
    • Sony RX series 
    • Sony a600 Series 

    As Chase Jarvis so eloquently stated: “The best camera is the one on you.” So, find a camera that you are most comfortable with.  

    State of mind

    Be present, leave your phone in your pocket, and immerse yourself in your location. Keep yourself from “chimping”, the habit of checking every photo on your camera display immediately after capture. You don’t want to miss what Henri Cartier-Bresson called “The decisive moment” where everything comes together in the perfect moment, and you hit the shutter. 

    Be curious, explore that doorway that leads to an amazing courtyard, that hidden alleyway that is a graffiti artist gallery, and travel through the locals’ part of town. Unique photos often come from these unexpected places.

    Let’s talk about the elephant in the room: the fear of taking pictures of strangers. The first step is never easy. Whether taking candids or street portraits, your approach starts with you—Transform the fear of taking a picture into the fear of missing an opportunity. 

    Be approachable. A smile is contagious. Open with a compliment when asking someone for permission to photograph them. The worst thing they can say is no, but more often than not, they will say yes.

    Camera settings

    Camera settings depend on the look you want to achieve. Ernst Haas, for example, used slow shutter speeds in his street photography to create beautiful, painting-like blurred images.

    To capture sharp street candids use 1/125 of a second shutter speed as your baseline. You can use Shutter Priority mode to maintain this shutter speed and let your camera automatically adjust the aperture and ISO. If you prefer to solely focus on composition, Manual mode allows you more artistic control allowing you to dictate the depth of field with the aperture to isolate and focus just on your subject or incorporate the background.

    What about ISO? Today’s digital camera sensors can almost see in the dark, (cough) Sony. Not too long ago, digital noise was an issue with digital images. These days, many camera manufacturers’ 800 ISO is hard to distinguish from 100 ISO. In night street photography, you will have to push the ISO to maintain a 1/125 shutter speed. Going as far as 1600 ISO and above where noise will appear can be easily denoised in post with software from Adobe, DxO, and Topaz, enabling you to capture scenes that were once unattainable.

    Patience and time

    When taking candid street photos, I first look at backgrounds. The background affects the composition of my frame—will it tell a story, juxtapose, complement, and draw the eye to my subject? When I come across an interesting background and perfect light, I seek out a light pole, doorway, or something that hides me out of direct eyesight of people and wait. Set your frame and let people walk into it. Patience is key; it could be a fraction of a second or hours to capture that perfect moment. Patience will reward you, so take your time. 

    Create the habit of having a camera on you every time you step out the door. Photography is a lifelong learning art, one you learn from every photo you take. Over time you will build a body of work that not only tells others’ stories but yours. 

    Be respectful and mindful

    If someone notices you and tries to avoid being photographed, respect their privacy and don’t photograph them. Not all places allow taking pictures of people in public, so a quick Google search can inform you about the local laws.

    Be open to talking to people. I have had some life-enriching conversations on street corners that renewed my faith in humanity and inspired me to photograph more. 

    Be aware of your surroundings, doing a 360º scan around you often keeps you aware and safe. 

    Find inspiration

    In photography, like other art mediums, it is influenced by a multitude of sources. From life experience, literature, music, visual art, history, and interactions with other photographers will inspire your street photography. Reading and watching stories set where you will be photographing will bring you to new locations. Learning the history of an area provides a deeper understanding of its layers and richness.

    Create a playlist filled with songs about the city you’re exploring, it will set the mood and help you feel connected to the fabric of that city. Painters’ visions of the place you will photograph will inspire your colour palette and composition. Photo Walks with other photographers will allow both of you to see new things.

    The Decisive Moment by Henri Cartier-Bresson

    Look at other street photographers’ work. There are, of course, too many to list here, but here are a few on my bookshelf as a starting point to find inspiration.

    • The Decisive Moment by Henri Cartier-Bresson
    • Vivian Maier: Street Photographer by John Maloof
    • The Americans by Robert Frank 
    • Ernst Haas: New York in Color, 1952-1962 by Phillip Prodger
    • Slide Show: The Color Photographs of Helen Levitt
    • William Eggleston’s Guide by John Szarkowski 

    Inspire yourself to go out every day and take pictures. Your unique perspective of the world will be seen by others through your lens. It is all about moments, the light, and personal growth. 

    To see more of David Castillo’s work, check out his website here.

  • Thinking about Street Photography

    Thinking about Street Photography

    by Michael Wayne Plant. 

    This text from a brief talk on my Thinking about Street Photography, as a guest speaker for Maine Photography Workshop, as part of David Castillo’s Street Photography online workshop.

    Introduction.

    Hi, I am Michael Wayne Plant, I am a Portrait, Street and Social Documentary photographer based in London. I was born in New Zealand, and I started in my photography career in Brisbane, Australia, as a commercial do anything photographer. Subsequently, I made advertising images for advertising agencies, product catalogs for Australias biggest hardware store chain, the occasional wedding and lots of portraits. Then I started to create images for model portfolios and I decided that I liked that a lot. I used to buy Italian and French fashion magazines that were always at least 4 months old, in those days they cost $25.00 (Australian) each.

    Once I had decided that I very much wanted  to become a fashion photographer, I just did not know how. Once I started to make model portfolio images in dawned on me that I needed to get myself somewhere that I stood a chance of doing well. First I tried Sydney and then I moved to London, originally to assist. Then when I did not get assisting gigs, I started to do what at the time was called model tests which involved working with stylists, hair and makeup artists to build a portfolio.

    After a while I moved around a bit to Greece, Milan, New York and then Paris. As I had discovered that they paid to make images for models portfolios. Whereas, in London you paid for your own film and processing, so it was very expensive to experiment and build a good portfolio. Eventually, I got to work with good mid level fashion magazines (like Minx, Spoon, Depeche Mode Cosmo, etc) and fashion clients and I got to make some images, that I am really proud of. Then, I started to feel that I needed to change, as the models where always about the same age and I getting older.

    Study

    So I went to university and studied an MA in Photography and Urban Cultures at Goldsmiths. This is the only photography MA in a sociology department anywhere in the world, it enabled me to learn and articulate my practice in a very different way. After my degree,  I started to make images using street photography techniques and working along Social Documentary lines, I continue to make portraits these three areas of photography fit nicely together and make up how I define my practice, that will with luck enable me to remain a photographer all my life.

    I also started to teach photography and ended up teaching for around 9 years at various colleges, including running a photography department in one Central London College, where each year we had about 700-800 photography students on a wide range of courses on anything from short 5 week courses to year long certificate and diploma courses. Covid came along and I never went back to teaching as my wife’s parents started to need full time care, so we became live in carers.

    Then about two years ago, I got a part time job at DxO, doing PR and product liaison. I now work with a lot of photographers and have gained a lot of experience working with people who do a lot of social media and YouTube. This is helping me, as I move more fully into the next phase of what I do as a photographer. Which is to concentrate on an area of photography, that has always been hard to make money with, that is social documentary and street photography. 

    Philosophy of Street Photography.

    My philosophy of street photography is informed by my engagement with the world around me, my academic background and the practice of photographers who are both my contemporaries and those who were active since street photography became a thing.

    For me, it is taking moments out of time from our contemporary lives and holding them so they show people in the future this is what life looked like when …. you made the image.

    To give you some examples of photographers, Helen Levitt made great images in the 1940’s of kids out on the streets of NYC visually you do not see this anymore. Another example is Robert Frank while he did not start the cross country exploration of America their where others before him who did this, he made one of the most famous bodies of work that combined personal documentary photography with techniques that we now consider street photography which became the book The Americans.

    Garry Winogrand is another example of a photographer who struggled with what an image could look like on the streets and I know he made some great images along with a lot of rubbish images. Most photographers working in public spaces make a lot of images that do not work. For one reason or another and if they get a good image that keeps them going, till the next time they get an image that conveys what they what to say about life, as it is lived on the streets of our societies.

    I use a lot of documentary conventions in my street photography. In that the only image adjustments that I do is I set my whitepoints, black points, adjust white balance, and do a bit of dodge and burning, effectively lighting or darkening areas of the image to render the image more legible. I am not interested in taking out objects within the frame or sin of sins using replacement sky or generative fill tools. Those things have no place in a documentary photographer’s workflow.

    You as the photographer is responsible for what you see and frame to make your image, if you do not want something in the frame, then don’t include it in the photo, find a different place to stand or wait for the offending thing to move out of your frame, do not take it out later with generative fill.

    You are the author of your own work and if you destroy your reputation by manipulating your images then people will look at what your work differently. I for one, will never look at Steve Curry’s work the same way again, after I found out that he regularly photoshops elements out of his images. As for me his truth has gone and once that trust is gone, you no longer trust that photographers work, for this reason I do not do it, I never manipulate a street or documentary image.

    Fashion images are a different thing, so can portraits be, depending also on what it is that you are trying to say. For example if you are making faltering portraits for someone where they want to look cleaned up and glossy, then go ahead. If however, you are making documentary portraits, then do not ever retouch your images in that way. 

    Talk about my work.

    I have been a digital photographer since 2004 prior to that I used film cameras and I have used everything from 35mm to 5×4 cameras ranging from Mamiya 645, Pentax 6×7, Pentax 35mm then Nikon35mm and Contax 35mm rangefinder’s. For about 8 years, I was a Sony Global Imaging Ambassador. Currently, I use a combination of Nikon (DSLR and Mirrorless) and Leica-M Rangefinder cameras in both digital and film formats. 

    My favourite way of working is to find a subject and work on understanding it. I am endlessly. fascinated by how capitalism has captured our imagination and has rendered almost any other form of structuring our economic life impossible, to the point now where it is almost like the air we breathe, invisible to us. From that, I aim to make images that visualise this and for me this is really hard, as photography is a visual medium and I am thinking about something that has essentially become invisible to us in our daily lives.

    I am not sure if I succeed, however it is something that I am working to render visible. Some photographers manage it. I have recently picked up a book by Kristy Mackay called ‘The Magic Money Tree’ which is a great example of how a photographer has addressed economic inequality and the social landscape created by contemporary capitalism. 

    With regards to my street photography, I tend to work with Leicas on the street partly because they are small and discrete. No big zoom lens. Also it is more to do with how I use them, I like to look through a viewfinder and to observe the world, sometimes fast and somethings slowly. The ability to zone focus and to practice the setting of distance on the camera by feel with the tabs underneath the lens, with practice becomes faster and more accurate than any autofocus system. This means that I can spend time, concentrating on the things or action that I am photographing.

    The standard advice for street photographers is get good shoes, I also think you should also learn where the good coffee shops are so you can have a break. Sit down and rest your feet so that when you are walking that you are not thinking my legs/feet are tired but that you are solely focused on the moment you are observing and all the other things in your mind disappear as you enter into the zone of photography. One thing that always struck me as good advice if you are struggling to make images on the street which Martin Parr once said to me, is that ‘you are not taking their image, but you are making your photo’. It is a small change in your mindset, but it is a huge thing for your emotional ability to make images of strangers on the streets. 

    The Tony Ray-Jones Approach to making images.

    I really liked the list that I saw in a Tony Ray-Jones exhibition about his thinking on his approach that he needed to remember to do when making his images.

    It went like this: Approach

    • Be more aggressive
    • Stay with the Subject matter (be patient)
    • Take simpler pictures
    • See if everything in the background relates to the subject matter
    • Vary composition & angles
    • Be more aware of composition
    • Don’t take boring pictures
    • Get in closer (use 50mm lens)
    • Watch camera shake (shoot 250th or above)
    • Don’t shoot to much
    • Not all eye level
    • No middle distance

    This list, as it says a lot about a good approach to making images on the street. Though, I am not so sure I like the 50mm lens bit. I do get that though as it does get you closer with out physically having to be there in your subjects face. I like using a 28mm lens for its greater depth of field for any given aperture, I prefer to use a 35mm as it is wide enough to get most things in the frame without needing to be to close to the subject. And when you do get close things don’t look weird from wide angle distortion. I have used a 21mm and that is okay but it is wide and you have to be really careful how you frame your subject.

    When I am using my Nikons my favourite lens is a 40mm as it is similar to our own angle of view so it just feels natural. I have 40mm lens for all of my lens mounts Nikon Z-mount, DSLR F-mount and Leica M-mount. I would use this more often on the Leica however the Leica cameras do not have framelines in their viewfinders for 40mm, so there is a dissonance in using them, as the 40mm brings up the framelines for the 50mm lens.

    On Making Images.

    I walk a lot, I get impatient standing to long in one place, waiting for something to happen, I also think that this is not always a good idea, as sometimes you do need to give a place time to find the right elements, to come together to make an image. As I am getting older, I have slowed down a little. I also get a bit nervous sometimes about raising my camera to photograph complete strangers, especially if they are women as I do not want to be that creepy man with camera.

    I find that if my camera is already up making an image and someone walks into the area that I am obviously photographing in, then it is much easier to make another image, I no longer have that hesitancy that comes with raising ones camera to ones eye in the initial moment. Often, I carry my camera as if I am about to use it right then. And it is surprising how often no one ever says anything, or sometimes it can even lead to an unexpected conversation. I am always happy to talk to strangers, as I find I learn new little things about life, as other people perceive it not just from my own perspective. I love this aspect of street and social documentary photography, the learning about others and the lives that we all lead.

    Most people, are way to busy to worry about that photographer making images, they just let you get on with it. You can always sense when someone really is not wanting their image made. Especially when you have been working for a while, it just becomes a 6th sense you develop, for me photography is like a invisibility cloak, it lets me be present but also to be engaged with the world, so I can get on with making images. I am not taking anyones photo, I am making my own images, this aspect makes it easier to work on the street. 

    Right now, I am starting to work on a new body of work and for the first time is a long time I am going to work with Black and White to make one part of the project as a way to create a distinction between two halves of a project. As I have not worked in Black and White seriously, since I went to digital cameras, it is exciting to shake things up a little bit. 

    This Article was originally published on www.michaelwayneplant.com

    If you got this far, thank you for reading.

    To see recent images from Michael Wayne Plant visit his BlueSky account.

    https://bsky.app/profile/michaelwplant.com